Quick Start Guide
For a quick start please read our quick start guide to get up and running in seconds.
Flawnter Requirements
Flawnter supports both command line and GUI in one jar file. Make sure you download the right zip file for your OS. Then unzip the flawnter folder. For the GUI you can just double click on flawnter.jar. For the command line just run java -jar flawnter.jar -sast <path or file to scan>. Refer to command line usage for more details. You need OpenJDK/Java 8 or later version to run Flawnter. Make sure you download the correct Flawnter version. If you not sure which bit version of Flawnter you need, you can open your system command prompt/terminal and type "java -version". If it's 64 bit java then you need to download the 64 bit version of Flawnter. If it's 32 bit then download the 32 bit version of Flawnter.
Java Stack Memory Requirements
The default stack size of JVM is somewhere around 320K to 1024K depending which platform you use. If you get stack overflow error you can increase the JVM stack memory. For the command line run java -Xss16m -jar flawnter.jar -sast <path or file to scan>. If more stack memory is needed then increase the 16 megabytes to larger number. For example passing -Xss32m will use 32 megabytes of stack memory.
For the GUI you can run the rungui batch/bash file to launch the Flawnter GUI which by default uses -Xss64m parameter.
Java Heap Memory Requirements
The default heap size of JVM is 1/4 of system memory or 1 or 2 GB of memory. This should all be enough memory to scan with Flawnter. However if you get heap memory error then you can increase the JVM heap memory. For the command line run java -Xmx4096m -jar flawnter.jar -sast <path or file to scan>. If more heap memory is needed then increase the 4096 megabytes to larger number.
For the GUI you need to edit rungui batch/bash file by adding -Xmx4096m parameter before running the batch/bash file. Increase -Xmx value as needed.
Using proxy
If you are using a proxy then you can pass the following command to Java. java -Djava.net.useSystemProxies=true -jar flawnter.jar. Flawnter also comes with rungui-proxy.bat or rungui-proxy.sh that will set to system proxy if you just run the bat/bash file. Note that if you are using self-signed certificates for your proxy, make sure the certificate is added to the Java keystore. Alternatively, you can set the debug value to true in the flawnter.cfg file, which will disable certificate checking.Command line usage
To get the command line usage type java -jar flawnter.jar -h
For local files: java -jar flawnter.jar <command> <folder/file to scan> <report path>
   Command: -sast
   Folder/File path to scan for static code analysis
   Report folder path to output the results. Optional
   Example: java -jar flawnter.jar -sast c:\test\code c:\test\report
For GitLab: java -jar flawnter.jar <command> <base url> <project id> <branch> -auth <token> <report path>
   Command: -sast-gitlab
   API base URL. Default is https://gitlab.com
   Repo project ID
   Repo branch name. Default is main
   Authorization token. Required for private repo scanning. Omit -auth for public repos
   Report folder path to output the results. Optional
   Example: java -jar flawnter.jar -sast-gitlab https://gitlab.com 15496125723 main -auth iufrzCvdMcHxBDsz scanreport
For GitHub: java -jar flawnter.jar <command> <base url> <user/owner> <repo> <branch> -auth <token> <report path>
   Command: -sast-github
   API base URL. Default is https://api.github.com
   User/Owner of GitHub
   Repo name
   Repo branch name. Default is main
   Authorization token. Required for private repo scanning. Omit -auth for public repos
   Report folder path to output the results. Optional
   Example: java -jar flawnter.jar -sast-github https://api.github.com cybertest testrepo main -auth ghp_msW985ngyubeyn9x32fi9ur scanreport
For BitBucket: java -jar flawnter.jar <command> <base url> <api version> <project id> <repo> <branch> -auth <user:password or access token> <report path>
   Command: -sast-bitbucket
   API base URL. Default is https://github.com
   Workspace ID
   Repo name
   Repo branch name. Default is main
   Username and app password. Required for private repo scanning. Omit -auth for public repos
   Report folder path to output the results. Optional
   Example Cloud: java -jar flawnter.jar -sast-bitbucket https://api.bitbucket.org 2.0 cybertest testrepo main -auth user1:RvMJ4viTHrvegtd scanreport
   Example Server: java -jar flawnter.jar -sast-bitbucket https://bitbucket.example.com 1.0 cybertest testrepo main -auth BBDC-V3zeauRpbMx scanreport
For Confluence: java -jar flawnter.jar <command> <API version> <base url> <limit> <username or email> <API token> <report path>
   Command: -confluence
   API version
   API base URL
   Page limit (Approximate number of pages to scan. Set to 0 for no limit)
   Username/Email
   API token
   Example: java -jar flawnter.jar -confluence 2 https://subdomain.atlassian.net 0 user@youremail.com ATATT3xFfGF01975hPVuedX3H4yd scanreport
   Example: java -jar flawnter.jar -confluence 2 https://subdomain.atlassian.net 5000 user@youremail.com ATATT3xFfGF01975hPVuedX3H4yd scanreport
For Jira: java -jar flawnter.jar <command> <API version> <base url> <project id> <limit> <username or email> <API token> <report path>
   Command: -jira
   API version
   API base URL
   Project ID/Name
   Content limit (Approximate number of content to scan. Set to 0 for no limit)
   Username/Email
   API token
   Example: java -jar flawnter.jar -jira 3 https://subdomain.atlassian.net proj1 0 user@youremail.com ATATT3xFfGF01975hPVuedX3H4yd scanreport
   Example: java -jar flawnter.jar -jira 3 https://subdomain.atlassian.net proj2 5000 user@youremail.com ATATT3xFfGF01975hPVuedX3H4yd scanreport
For Asana: java -jar flawnter.jar <command> <API version> <base url> <project id> <limit> <access token> <report path>
   Command: -asana
   API version
   API base URL
   Project ID (This is a number)
   Content limit (Approximate number of content to scan. Set to 0 for no limit)
   API access token (Personal Access Token)
   Example: java -jar flawnter.jar -asana 1 https://app.asana.com proj1 0 2/1207012345670633/1207123451234567:62f201ba7ca7677de1c43bfb8efd8445 scanreport
For AzureDevOps: java -jar flawnter.jar <command> <base url> <organization> <project> <branch> -auth <token> <report path>
   Command: -sast-azure-devops
   API base URL. Default is https://dev.azure.com
   Organization
   Project
   Repo branch name. Default is main
   Authorization token. Required for private repo scanning. Omit -auth for public repos
   Report folder path to output the results. Optional
   Example: java -jar flawnter.jar -sast-azure-devops https://dev.azure.com cybertest testproj main -auth a754pkq6zkpwRvMJ4viwmegtv scanreport
For local dependency scan: java -jar flawnter.jar <command> <sub-command> <extra-command> <folder/file to scan> <report path>
   Command: -dependency-scan or -sca
      Sub-command: -vul         Vulnerability analysis only. Optional
      Sub-command: -lic         License risk analysis only. Optional
      Extra-command: -noupdate  Don't update local data feeds. Optional
      Note: If sub-command is omitted then it will scan for both options. If extra-command is omitted it will auto update data feeds
   Folder/File path to scan
   Report folder path to output the results. Optional
   Example: java -jar flawnter.jar -dependency-scan c:\test\path c:\test\report
   Example: java -jar flawnter.jar -dependency-scan -vul c:\test\path c:\test\report
   Example: java -jar flawnter.jar -dependency-scan -lic c:\test\path c:\test\report
   Example: java -jar flawnter.jar -dependency-scan -noupdate c:\test\path c:\test\report
For local dependency import scan: java -jar flawnter.jar <command> <extra-command> <import sbom json file> <report path>
   Command: -dependency-scan-import or -sca-import
      Extra-command: -noupdate  Don't update local data feeds. Optional
      Note: If extra-command is omitted it will auto update data feeds
   Import SBOM file to load and scan
   Report folder path to output the results. Optional
   Example: java -jar flawnter.jar -dependency-scan-import c:\test\sbom.spdx.json c:\test\report
   Example: java -jar flawnter.jar -dependency-scan-import c:\test\sbom.cyclonedx.json c:\test\report
   Example: java -jar flawnter.jar -dependency-scan-import -noupdate c:\test\sbom.cyclonedx.json c:\test\report
For DAST scan: java -jar flawnter.jar <command> <URL> <depth> -auth <authentication json file> <report path>
    Command: -dast
    Website URL/IP
    Depth is max number of URLs the crawler will find
    Authenticated JSON file. Optional.
    Unauthenticated example: java -jar flawnter.jar -dast https://somedomain.com 20 c:\test\report
    Authenticated example: java -jar flawnter.jar -dast https://somedomain.com 20 -auth auth.json c:\test\report
For DAST SSO scan: java -jar flawnter.jar <command> <SSO Protocol> <authentication json file> <report path>
    Command: -dast-sso
    SSO Protocol
    Authenticated JSON file.
    Example: java -jar flawnter.jar -dast-sso saml2 auth.json c:\test\report
For API security scan: java -jar flawnter.jar <command> <api file path> <report path>
   Command: -api
   Example: java -jar flawnter.jar -api c:\test\postman-collection.json c:\test\report
For AI Model security scan: java -jar flawnter.jar <command> <ai file path> <report path>
   Command: -ai-model
   Example: java -jar flawnter.jar -ai-model c:\test\ai-postman-collection.json c:\test\report
For AI Dataset scan: java -jar flawnter.jar <command> <dataset file/folder> <ai dataset rules file> <report path>
   Command: -ai-data
   Example: java -jar flawnter.jar -ai-data c:\test\datasets c:\test\ai-dataset-rules.json c:\test\report
   Example: java -jar flawnter.jar -ai-data c:\test\datasets\data.json c:\test\ai-dataset-rules.json c:\test\report
For malware scan: java -jar flawnter.jar <command> <sub-command> <extra-command> <folder/file to scan> <report path>
   Command: -malware-scan or -mscan
      Sub-command: -skip-archives  Skip scanning inside zip or archive files. Optional
      Extra-command: -noupdate  Don't update local data signatures. Optional
      Note: If sub-command is omitted then it will scan inside archive files. If extra-command is omitted it will auto update data signatures
   Folder/File path to scan
   Report folder path to output the results. Optional
   Example: java -jar flawnter.jar -mscan c:\test\path c:\test\report
   Example: java -jar flawnter.jar -mscan -skip-archives c:\test\path c:\test\report
   Example: java -jar flawnter.jar -mscan -noupdate c:\test\path c:\test\report
For Port scan: java -jar flawnter.jar <command> <host> <port> <report path>
    Command: -port-scan
    Hostname or IP
    Port number or use 0 to scan all ports
    Example: java -jar flawnter.jar -port-scan somedomain.com 443 c:\test\report
    Example: java -jar flawnter.jar -port-scan somedomain.com 0 c:\test\report
For Website crawl: java -jar flawnter.jar <command> <URL> <depth> <report path>
    Command: -web-crawl
    Website URL/IP
    Depth is max number of URLs the crawler will find
    Example: java -jar flawnter.jar -web-crawl https://somedomain.com 1000 c:\test\report
For Kubernetes scan: java -jar flawnter.jar <command> <sub-command> <server IP/hostname to scan> <report path>
   Command: -kube-scan
      Sub-command: -vul     Check against CVE vulnerabilities only. Optional
      Sub-command: -ano     Check anonymous authentication only. Optional
      Note: If sub-command is omitted then it will scan for both options
   Server IP/Hostname to scan
   Report folder path to output the results. Optional
   Example: java -jar flawnter.jar -kube-scan https://localhost:8443 c:\test\report
   Example: java -jar flawnter.jar -kube-scan -vul https://localhost:8443 c:\test\report
   Example: java -jar flawnter.jar -kube-scan -ano https://localhost:8443 c:\test\report
For Flawnter auto update: java -jar flawnter.jar <command>
   Command: -autoupdate or -au
   Example: java -jar flawnter.jar -autoupdate
For Hashing file: java -jar flawnter.jar <command> <file path>
   Command: -hash (same as sha1)
   Command: -sha1 (same as hash)
   Command: -md5
   Command: -sha256
   Command: -sha512
   Command: -ssdeep
   Example: java -jar flawnter.jar -hash c:\test\somefile.php
   Example: java -jar flawnter.jar -sha1 c:\test\somefile.java
   Example: java -jar flawnter.jar -md5 c:\test\somefile.jar
   Example: java -jar flawnter.jar -sha256 c:\test\somefile.exe
   Example: java -jar flawnter.jar -sha512 c:\test\somefile.dll
   Example: java -jar flawnter.jar -ssdeep c:\test\somefile.exe
For Flawnter version: java -jar flawnter.jar <command>
   Command: -version
   Example: java -jar flawnter.jar -version
GUI usage
To run Flawnter in GUI mode you can either double click on the flawnter.jar file or run the command java -jar flawnter.jar
Scanning local files and folders
There are few ways you can scan local files and folders. The most easiest is drag and drop files or folder on the GUI. The other is either select the scan button on the GUI or use File menu. Once the scan is complete you will see quick summary dialog of the results. If you have a license then it will also generate detail reports of different formats. Please refer to the Reporting section for the details of the reports it generates.
Scanning GitLab repo files and folders for both cloud-based and self-hosted platforms
To scan source code files on GitLab, from the menu select "File->Scan GitLab". Then enter the information required. For public repo scanning there is no need for authentication token, however there may be limitations on number of files allowed to scan set by GitLab. To make sure there are no limitations you can enter your personal access token in Auth Token section. Also all private repos require access token. You can read more about GitLab access tokens from their documentation page https://docs.gitlab.com/ee/user/profile/personal_access_tokens.html.

For more details please download our How to scan GitLab Guide here.
Scanning GitHub repo files and folders for both cloud-based and self-hosted platforms
To scan source code files on GitHub, from the menu select "File->Scan GitHub". Then enter the information required. For public repo scanning there is no need for authentication token, however
there may be limitations on number of files allowed to scan set by GitHub. To make sure there are no limitations you can enter your personal access token in Auth Token section. Also all
private repos require access token. You can read more about GitHub access tokens from their documentation page
https://docs.github.com/en/authentication/keeping-your-account-and-data-secure/creating-a-personal-access-token.
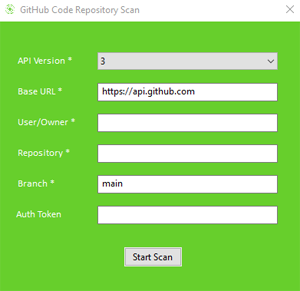
For more details please download our How to scan GitHub Guide here.
Scanning BitBucket repo files and folders for cloud-based platform
To scan source code files on BitBucket, from the menu select "File->Atlassian->Scan BitBucket". Then enter the information required. For public repo scanning there is no need for authorization, however there may be limitations on number of files allowed to scan set by BitBucket. To make sure there are no limitations you can enter your App password in Authorization section in the format username:password. Also all private repos require App password. You can read more about BitBucket App passwords from their documentation page https://support.atlassian.com/bitbucket-cloud/docs/app-passwords.

Scanning BitBucket repo files and folders for server self-hosted platform
To scan source code files on BitBucket Server, from the menu select "File->Atlassian->Scan BitBucket". Then select API version to 1.0 and the rest information required. For Base URL make sure you enter your BitBucket server domain name or IP addresses including the port number if not using default 443 port. For the Authorization you can enter username:password. The colon is needed to separate the username and password. You can also use http access token and enter that token in Authorization section instead of username and password. You can create http access token from the repository settings. You can read more about it from their documentation page https://developer.atlassian.com/server/bitbucket/rest/v806/intro.

For more details please download our How to scan BitBucket Guide here.
Scanning Confluence pages for secrets and sensitive data
To scan Confluence pages for passwords, secrets and other sensitive data, from the menu select "File->Atlassian->Scan Confluence". You can also run Flawnter extensions like Extended Secrets Finder to look for more patterns for finding secrets and sensitive data. If you like to use your own regex rules, you can use our Custom Data Finder extension. Extensions can be downloaded from Flawnter Extensions.
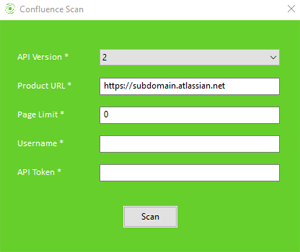
For more details please download our Confluence Guide here.
Scanning Jira pages for secrets and sensitive data
To scan Jira pages for passwords, secrets and other sensitive data, from the menu select "File->Atlassian->Scan Jira". You can also run Flawnter extensions like Extended Secrets Finder to look for more patterns for finding secrets and sensitive data. If you like to use your own regex rules, you can use our Custom Data Finder extension. Extensions can be downloaded from Flawnter Extensions.

For more details please download our Jira Guide here.
Scanning Asana pages for secrets and sensitive data
To scan Asana pages for passwords, secrets and other sensitive data, from the menu select "File->Scan Asana". You can also run Flawnter extensions like Extended Secrets Finder to look for more patterns for finding secrets and sensitive data. If you like to use your own regex rules, you can use our Custom Data Finder extension. Extensions can be downloaded from Flawnter Extensions.
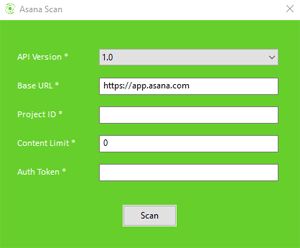
For more details please download our Asana Guide here.
Scanning Azure DevOps repo files and folders for both cloud-based and self-hosted platforms
To scan source code files on Azure DevOps, from the menu select "File->Scan Azure DevOps". Then enter the information required. For public repo scanning there is no need for authentication token, however there may be limitations on number of files allowed to scan set by Azure DevOps. To make sure there are no limitations you can enter your personal access token in Auth Token section. Also all private repos require access token. You can read more about Azure DevOps access tokens from their documentation page https://docs.microsoft.com/en-us/azure/devops/organizations/accounts/use-personal-access-tokens-to-authenticate.

For more details please download our How to scan Azure DevOps Guide here.
Dependency Scan - Vulnerability Analysis
Flawnter Dependency Scan is a Software Composition Analysis (SCA) feature that attempts to detect publicly disclosed vulnerabilities contained within a project’s dependencies. It uses Common Platform Enumeration (CPE) identifier for a given dependency. If found it will provide vulnerability details and the associated CVE entries and references. Flawnter uses data feeds from the National Vulnerability Database published by the NIST website (https://nvd.nist.gov) as well as from a few other sources. Flawnter automatically updates the local data feeds from NIST or other websites. The scan is very fast and has been proven to detect the well-known Log4j RCE vulnerability that was disclosed in late 2021.
Flawnter also supports the analysis of Docker container images. It scans Dockerfiles for dependencies known to have vulnerabilities. In cases where the dependency lacks a version number or cannot be determined, we recommend scanning container files locally to enhance the effectiveness of the analysis.

Dependency Scan - License Risk Analysis
Flawnter Dependency Scan allows you to also scan for open source license and legal risks. Software developers use many open source components and libraries for building applications. The problem is some open source licenses may pose compliance and legal issues. Flawnter License Risk Analysis helps identify these open source licenses and classifies them into risk to help you understand your overall software compliance risk.
Dependency Scan - SBOM Creation
Flawnter Dependency Scan creates SBOM (Software Bill of Materials) in CycloneDX/SPDX JSON format file of dependency components/libraries. This empowers organizations to gain a holistic view of their software dependencies, regardless of vulnerability status. Since CycloneDX/SPDX is an industry-standard format for representing SBOMs, you can share it with parties/agencies that require SBOM.
Dependency Import Scan
Flawnter Dependency Import Scan allows you to import SBOM CycloneDX/SPDX JSON file to scan through the packages/components for known vulnerabilities.
DAST Scan
Flawnter DAST (Dynamic Application Security Testing) will look for security bugs in your application using dynamic analysis. This means your application must be running to test. We recommend to run DAST on non-production environment to avoid any performance/security impact on production systems and data. Note when deepscan flag in flawnter.cfg is set to false the scan will perform faster scans, but if you want more deeper and accurate scans you can set deepscan flag to true. Please note that the DAST scan may take a significant amount of time, depending on the number of URLs and parameters it identifies, as well as the network traffic speed. If the scans takes longer than few hours then you may want to lower the Depth value accordingly. For more details please download our DAST Testing Guide here.
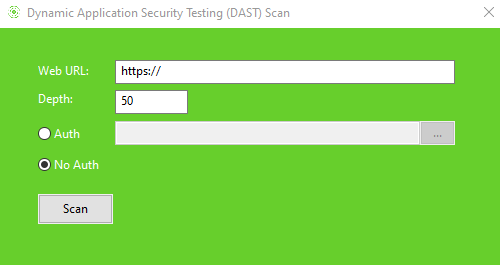
DAST SSO Scan
Flawnter DAST SSO will look for security vulnerabilities (no signature test, embedded/wrapper xml tests, tampering test, self-sign cert test, xpath test, xxe test, xss test, etc.) in service/resource provider side. For more details please read our DAST SSO Security Testing Guide and DAST SSO Testing.

DAST Interactive Scan
Flawnter DAST Interactive Scan is only available in GUI mode. It allows the user to interact with a web application while Flawnter captures the http/https requests and responses where you can later scan for security vulnerabilities. In a nutshell Flawnter DAST Interactive is a http/https proxy but it's a powerful feature that allows you to test your application by controlling what you want to test. To point your browser to Flawnter proxy, you can use the command line: chrome --proxy-server=127.0.0.1:8080. You can change the port number to match the Flawnter proxy server. While this command is for Chrome/Chromium, it may work for other browsers or you may need to tweak it little. To download Chromium you can follow the steps from Download Chromium. Once you download Chromium zip file you need to unzip the folder and rename it to chromium. Then copy/move this folder to flawnter folder. For example in Windows the path will look like something like: \flawnter\chromium\chrome.exe. You can also enable your system proxy server settings to point localhost and proxy port number you are using for Flawnter. For example in Windows this will be under "Internet Options->Connections->LAN Settings". To download and install Flawnter proxy cert, go to https://www.flawnter.com/download/doc/cybertest.crt. You can also generate the cert from Flawnter Configuration menu. For more assistance please contact us and we will be happy to help.

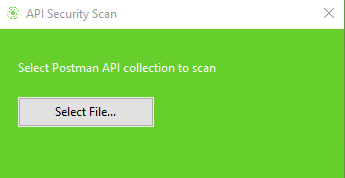
API Security Scan
Flawnter API security testing will scan your application REST APIs for security vulnerabilities. Currently it supports Postman collections in JSON format. If you have OpenAPI Specification (OAS) file, you can import in Postman as collection and then export it to JSON file. You can also use any 3rd party tool that can convert from OpenAPI to Postman collection. Our API security testing is similar to DAST except it tests only the APIs you define in the JSON file. Note when deepscan flag in flawnter.cfg is set to false the API security scan will perform faster scans, but if you want more deeper and accurate scans you can set deepscan flag to true. For more details please download our API Security Testing Guide here.
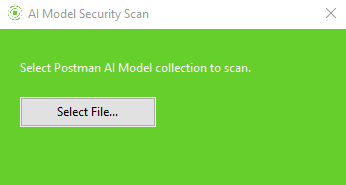
AI Model Security Scan
Flawnter AI model security testing is designed to identify vulnerabilities in AI systems by performing advanced security assessments, including prompt injection testing, insecure output handling analysis, and other security checks. Refer to AI model security testing page for details.
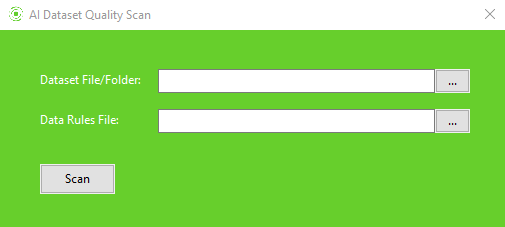
AI Dataset Quality Scan
Flawnter AI dataset quality testing ensures high-quality and ethical AI training data by scanning for issues such as offensive language, NSFW content, stereotypes, and biases. By identifying problematic data before it reaches AI models, the software helps improve fairness, reduce harmful outputs, and enhance overall model performance. Refer to AI dataset quality analysis page for details.
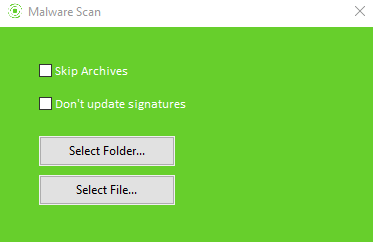
Malware Scan
Flawnter Malware scan will scan your folder or files for malware. It's important to note that our scan is for detection purposes only - it does not quarantine or remediate malware. While our malware scan strives for accuracy, there may be occasional false positives. For added security assurance, we recommend involving your security department or administrator to verify any flagged malware. Flawnter Malware scan uses malware detection signatures from variety of places including MalwareBazaar. The malware scan is an experimental feature. It might significantly change or be removed at any time.
Port Scan
Flawnter Port Scan can be used to check for open ports for a given host. To check for single port just enter the port number. You can also scan all ports by selecting 'Scan all ports' from GUI or use port 0 for command line.

Website Crawler
Flawnter website crawler can be used to crawl your website and report all links and pages found. Can also be used to build sitemap of your website. For large websites you can increase the depth which lets Flawnter know the maximum pages to crawl.

Kubernetes Scan - Vulnerability Analysis
Flawnter Kubernetes Scan is capable of scanning for known CVE vulnerabilities similar to Dependency Scan. It also has checks for anonymous authentication for various locations in Kubernetes.

How to use and configure flawnter configuration files
Flawnter does not require configuration file, however using configuration file does provide benefits. The flawnter.cfg is a text file and should be in current directory, typically this may be in the same path as flawnter.jar file. Default flawnter.cfg file comes with the zip file you download. You can also generate default flawnter.cfg from "Configuration->Generate->Default SAST Config" menu in the GUI. Here are the parameters of flawnter.cfg:
- name - App or scan name that gets added in the findings report.
- scantype - 1 means scan only security bugs, 2 means scan only quality bugs, 0 means scan both.
- scancategory - 0 = all, 1 = hard coded credentials. This option only works for Static Code Analysis.
- corescan - If true then run the main core scan engine of Flawnter including extensions. If you want only extensions to run then set this to false.
- binaryscan - If true (default) it will scan binary/executable files. If you don't want to scan binary files then set this to false. This option only works for Static Code Analysis.
- forcescan - Force scan true will scan the source code even if it has NOFLAWNTERSCAN tag. This option only works for Static Code Analysis. For API/DAST scan it will still scan if no-flawnter-scan is set true in response header.
- deepscan - Deep scan. Default is true starting v5.4.0. If set true it will use deep scanning analysis to find more bugs.
- suppressoutput - If set true it will suppress console output and only show the scan summary at the end. Has no effect on GUI.
- overwritereport - If true it will overwrite results report folder if it exists.
- scancomments - If true it will scan code in comments also. This option only works for Static Code Analysis.
- predictiveanalysis - If true (default) it will use predictive analysis algorithms to identify vulnerabilities in code that regular rules may have missed.
- autoupdate - If true it will auto update Flawnter with latest version after a scan. Default is false. This is for command line only. For the UI use Help->Check Update.
- severity - Show critical, high, medium, low, info or all = all severity findings. For multiple severity add pipe (|)
- confidence - Show high, medium, low or all = all confidence findings. For multiple confidence add pipe (|)
- platform - Specific platform to use. Values can be web, windows, android, ios, macos, none or leave it blank. Optional. Recommended to set this to none or leave it blank to indicate no specific platform.
- lang - Programming language code is written with: php, c, cpp, cs, vb, vbscript, java, javascript, typescript, nodejs, python, perl, ruby, go, objective-c, swift, kotlin, dart, abap, xml, yaml, cfg, powershell, binary or auto (automatically detect). Recommended to set this to auto to let Flawnter automatically determine the language.
- debug - By default debug is set to false. For troubleshooting and better error messages this can be set true.
- datafeeds - From where/which format NVD data feeds to use for Dependency Scan. Values can be nist-legacy/nist, osv. You can combine data feeds using comma. For example: "datafeeds=nist,osv". The default is nist-legacy,osv but the default may change in the future to nist,osv. Note: Our testing has confirmed that nist-legacy is lot faster than nist (uses APIs).
- nvdapikey - If you have NIST NVD apikey then you can put it here to increase the limit on number of requests Flawnter can call within 30 seconds window. For the details how to request API Key go to https://nvd.nist.gov/general/news/API-Key-Announcement. The default is none which means don't use NIST NVD API key.
- extension - Extension jar file path to run. For multiple extensions just add another on the next line. You can download extensions from here.
- exclude - Exclude from Flawnter scan. For multiple exclude just add another exclude line.
Exclude types:
- File/folder/URL name or path to exclude from scan.
- Exclude by file hash (md5, sha1, sha256, sha512) using format: <file size in bytes>:<file hash>.
- Exclude by CVE number using format: CVE-<id number>:<file name/path>.
- Exclude by package name using format: packagename:<name of the package>.
- Exclude by rule id using format: <rule id from the report>.
Programming languages support
Flawnter supports scanning code for over 25 programming languages. To get the full list you can check Flawnter Capabilities.
How to run Flawnter extensions
- Download Flawnter from download page if not already downloaded.
- Unzip the flawnter folder to path of your choice.
- Download Flawnter extension(s) from here.
- Unzip the extension files (.jar and .sig) into the flawnter folder.
- Open flawnter.cfg file in text editor and add the extension file name(s) e.g. extension=credit-card-finder.jar. Save the flawnter.cfg.
- Now when you run Flawnter scan, the extension(s) will also run based on the type of scan.
- All findings from the extension will be outputted in the Flawnter report.
Flawnter extension signature verification
All Flawnter extensions are signed by CyberTest using private key that is securely encrypted and protected. The <extension name>.sig file is the signature file Flawnter uses to verify each extension before running it. For verifying Flawnter downloaded zip file you can use PGP or GPG. The signature file can be downloaded from our download page. To verify Flawnter zip file you can run the command gpg --verify <flawnter zip>.zip.sig <flawnter zip>.zip. Note that you first need to have our public key to verify it. To request our public key please send email to us using either info@cybertest.com or info@flawnter.com. Also note that SHA1 checksum of Flawnter zip files are published on our download page for additional check.
Binary Analysis
Flawnter currently supports scanning only Windows executable (32 and 64 bits) files on local system/network. It does not scan executable files in GitLab/GitHub/BitBucket/Azure-DevOps.
License
When you download and run Flawnter it will run in trial mode but it will scan the code with no limitations, however it will not create findings report unless you buy Flawnter license. You can obtain the license from our website. Once payment is successful you will see download license button where you can download the license (flawnter.lic) file. Copy this license file in your current/working directory, typically this may be in the same path where flawnter.jar file is located. We accept credit cards for purchasing a license, however if you want to buy the license using another payment method please contact us at info@flawnter.com. For license pricing details please visit our pricing page.
License per user meaning
The per user licensing is actually very simple. A user can be a person or a machine/system/automation. For example if you have a person scanning the code with Flawnter and generating the report then that will be considered one license.
If you have an automation to scan and generate report then that automation that generates the report is considered one license. If you have two people or automation using the Flawnter to scan and generate reports then you will need two licenses.
Basically anyone (a person or machine) who uses Flawnter that needs to scan and generate findings report needs to use a license. You can't share a single license between multiple users, even if only one person uses it at a time.
Unable to download the license file
If you were unable to download the license file please send us email at info@flawnter.com with the transaction ID or invoice number and we will email it to you.
For Static/Dependency Analysis - How to exclude from scan
If there are false positives in Flawnter, you can exclude from the scan by doing one of the following:
- To exclude a source code line from scan add NOFLAWNTERSCAN tag at the end of line as comment. This is case-sensitive. Does not apply for binary files.
- To exclude the entire file/folder from scan, add the file/folder name or full path in flawnter.cfg next to attribute exclude. Example: exclude=fpcode.php
- To exclude the entire file from scan using file hash, add the hash in flawnter.cfg using the format <file size in bytes>:<file hash> next to attribute exclude. Example: 8735:5F8C23432C01EC125D64782DA16A0E4144DBF4D2. You can use your own tool to create md5, sha1, sha256 or sha512 hash of the file or use the command line of flawnter to create the hash you can add to exclude. Here is an example how to create hash of a file: java -jar flawnter.jar -hash somefile.php. Make sure to put the file size in front of the hash. Including file size helps improve the scan performance.
- To exclude file using CVE id, use the format <CVE>:<file name/path> next to attribute exclude. Example: exclude=CVE-1998-01234:somefile.jar. To exclude CVE on all files, use asterisk(*) instead of file name/path.
- To exclude using package name use the format exclude=packagename:<name of the package>.
For API/DAST Analysis - How to exclude from scan
If there are false positives in API/DAST Flawnter, you can exclude from the scan by doing one of the following:
- To exclude a REST Request/API from scan add no-flawnter-scan: true in the response header. This is case insensitive. To remove the exclude you can set this header to false or just remove it from the response header.
- To exclude a REST Request/API using URL you can add the URL in flawnter.cfg next to attribute exclude. Example: exclude=https://example-domain.com/test
Reporting
After Flawnter completes the scan, it will create findings reports of the results. By default it creates results folder called scanreport. If overwritereport flag in flawnter.cfg is false (default), the output report folder will automatically increment if the report folder exists. For example if scanreport folder exists it will create scanreport2 or scanreport3, etc. This only works on the GUI and not in command line since you have more control in cmd like specifying report output path. You will need a license to see the results of the scan. There are many different types of reports Flawnter creates to meet your needs. Here are the reports it creates:
- HTML format full details report
- HTML format simple report
- XML format generic report
- XML Junit format report
- XML Nunit format report
- Json format report
- CSV format report
- Text format report
- CycloneDX/SPDX Json format SBOM report (with dependency scan)
Things to note
To get most out of the static code analysis avoid cryptic or minified code. For example if you don't have the original javascript code and it's minified,
then it's better to unminify first using tools like Google closure compiler and then scan the code with Flawnter to get the best results.
Example: java -jar google_closure_compiler.jar --formatting=PRETTY_PRINT mycode.min.js
How to create Flawnter extension
Please contact us at info@flawnter.com if you like to get the details how to build Flawnter extensions.
